
The control starts up in Incremental jog mode. To jog the axes in continuous movement, you need to press the INCR/CONT key to switch from incremental to continuous jog mode.
The Machine Home position is fully Z+ (ram up) and X+ (saddle right)
|
The control starts up in Incremental jog mode. To jog the axes in continuous movement, you need to press the INCR/CONT key to switch from incremental to continuous jog mode. |
 The work lights
will come on automatically when the machine is powered up.
The work lights
will come on automatically when the machine is powered up.
You can turn the lights off and on by pressing the work light key on the jog panel.
You can control table ("spindle") rotation speed and direction manually with jog panel keys, or automatically with program codes.
Note that table direction is judged by tool direction. "Forward" or "Clockwise" is the direction you would run a standard twist drill. This is opposite how you would judge "clockwise" and "counterclockwise" if you were looking at the face of the table.
The spindle must be in Auto mode to use programmed M and S codes. The spindle must be in Manual mode to use the jog panel keys.
 |
Switch between Auto and Manual control modes. |
In manual mode, you can control operation and direction with these keys:
 |
Select spindle forward (CW tool) |
 |
Select spindle reverse (CCW tool) |
 |
Start spindle |
 |
Stop spindle |
In Auto mode, you can control operation and direction with these codes:
| M3 | Start spindle forward (CW tool) |
| M4 | Start spindle reverse (CCW tool) |
| M5 | Stop spindle |
| Snnn | Set speed to nnn RPM or SFM |
| G50 Snnn | Limit speed to nnn RPM when using constant surface speed mode |
In constant-RPM mode (G97) the S code specifies RPM. In constant surface speed mode (G96) the S code specifies SFM (surface feet per minute).
In either mode, you can further control speed with these keys:
 |
Increase speed |
 |
Set speed to 100% of programmed speed (Auto mode) or to half of maximum speed (Manual mode) |
 |
Decrease speed |
With the table stopped, you can momentarily jog it around at low speed with these keys:
 or  |
Jog table reverse (CW if looking down at table) |
 or  |
Jog table forward (CCW if looking down at table) |
The machine has a hydraulically shifted 2-speed gearbox.
Per management request, the CNC control has (as of April 2021) no provision for shifting ranges. The machine is always used in the high gear range.
Rail movement is powered by a 15HP motor on top of the bridge, which turns the elevation screws through right-angle gearboxes.
You can jog the rail up and down manually whenever Emergency Stop is released, the table is stopped, and no program cycle is active.
 or  + +  |
Jog Crossrail Up |
 |
Clamp or Unclamp Crossrail |
 or +  |
Jog Crossrail Down |
Before moving the crossrail, you must first release the clamps with the
Rail Clamp/Unclamp key.
If the rail is clamped when you press the Rail Clamp/Unclamp key, then then the control will drive to the unclamped position.
If the rail is unclamped or in between states when you press the
Rail Clamp/Unclamp key, then the control will drive to the clamped
position.
G28 Return Point
Most CNC programs will return the axes to the G28 return point (return point #1) at the start and end of a job, and during tool changes. The control will also move to that position if you press the Tool Check key while no program cycle is running (e.g. during setup and manual operations).
By default, the position for the G28 return point is machine zero: ram all the way up, carriage all the way right.
If tooling or the workpiece temporarily prohibits moving all the way to machine zero, you can change the X and/or Z position for G28. To do so:
The control will automatically operate the way lube pump any time an automatic program cycle is running. The way lube system will not operate when the machine is idle, or is being operated manually (e.g. with jogging controls).
Machine Parameter 179 controls the interval between way lube cycles, and the operating time for a cycle. The hundreds place of the Parameter 179 value is the lube cycle interval in minutes. The tens and ones place is the run time in seconds. For example, a value of 2010 means to run the pump for 10 seconds, every 20 minutes of program cycle time.
If the lube pump fails to build output pressure within the time specified in Parameter 721 (in seconds), then a fault will be triggered.
Once lube pressure is up, and the pump has been turned back off, the control
will monitor to see that the lube pressure bleeds off as expected.
If the lube pressure does not drop within the time specified in
Parameter 722 (in seconds), then a fault will be triggered.
Jog Panel Summary
The Auxiliary keys on the jog panel have the following functions:
 |
No function | |
Work Light Off/On | |
Jog Crossrail Up |
 |
No function |  |
No function | |
Unclamp or Clamp Crossrail |
 |
No function |  |
No function | |
Jog Crossrail Down |
 |
No function | |
Jog Table Reverse | |
Jog Table Forward |
In addition to the console jog panel, the machine is equipped with a Centroid WMPG-4 wireless MPG handwheel pendant. The handwheel pendant can be used for axis jogging and for cycle start, feed hold, table and crossrail control.
To use the MPG pendant, first press its silver power button. The display on the pendant should show a copy of the DRO axis position display.
To move an axis using the handwheel:
The handwheel can also be used as a spindle speed override control, or as a feedrate override control.
To adjust spindle speed, turn the increment-select knob to SPIN, then turn the wheel CW to increase spindle speed, or CCW to decrease spindle speed.
To adjust feedrate, turn the increment-select knob to FEED, then turn the wheel CW to increase the feedrate override, or CCW to decrease the feedrate override.
NOTE: if you use the WMPG-4 handwheel to change the feedrate override setting, this takes precedence over the position of the knob on the console jog panel. However, as soon as you turn the knob on the console jog panel again, then its setting will take over. This could cause an abrupt change in axis speed, especially if you had used the WMPG-4 wheel to turn the feedrate override down.
In addition to the MPG handwheel, the WMPG-4 pendant has Cycle Start, Feed Hold, and Tool Check keys. These keys function the same as the equivalent keys on the main jog panel.
There are two axis jog keys: "JOG -" and "JOG +". These keys will jog whichever axis is selected with the axis-select switch, in the jog mode (FAST/SLOW) that is selected on the main jog pendant.
In addition, with the axis-select switch in the "4th" position, the "JOG -" and "JOG +" keys can be used to jog the crossrail down and up, provided the crossrail is unclamped and no program cycle is running.
There are four customizable Macro keys. As of May 2024, these keys have the following functions:
|
Table Jog Reverse | |
Table Jog Forward |  |
no function |  |
no function |
The WMPG-4 pendant relies on a USB-connected wireless transceiver. This transceiver antenna sits on top of the console, and should be plugged into one of the console USB ports.
The WMPG-4 pendant requires two AA batteries. The battery compartment
is on the back, underneath the protective rubber cover.
M Function Summary
| M0 | Stop (wait for Cycle Start) |
| M1 | Optional Stop (wait for Cycle Start) |
| M2 | Program Restart (with wait for Cycle Start) |
| M3 | Spindle CW / Forward |
| M4 | Spindle CCW / Reverse |
| M5 | Spindle Stop |
| M8 | Flood Coolant On |
| M9 | Coolant Off |
M functions M91 and above are used internally in custom macro programs, but are generally not used directly in user machining programs.
See Chapter 11 of the Centroid T-Series Operator's Manual for descriptions
of the higher-numbered M functions.
Machine Parameters Summary
The following parameters on the Centroid Machine Parameters table are used for features specific to this machine.
| Parameter | Meaning | Value | Notes |
|---|---|---|---|
| P57 | Load meter display | 35 | Show meters for both axes plus spindle |
| P720 | Hydraulic pressure ride-through time (ms) | 2000 | Allowed time for oil pressure dip while spindle is running, before triggering error |
| P721 | Way lube pressure-up time (sec) | 6 | Allowed time running way lube pump, before pressure switch is expected to trip |
| P722 | Way lube pressure-down time (sec) | 120 | Time after way lube pump off, before pressure switch is expected to reset. |
| P724 | RPM for table jogging | 3.0 | Speed to turn table when using jog buttons |
| P990 | Spindle load meter scale (Volts) | 7.0 | Analog volts from Yaskawa spindle drive, for full-scale motor load |
| P991 - P992 | Servo load meters scale (Volts) | -2.5 | Analog volts from Yaskawa servo drives, for full-scale motor load |
For all other Machine Parameter functions, see Chapter 12 of the
Centroid T-Series Operator's Manual.
Yaskawa Servo Drive Parameter Settings
Most servo drive parameters are set to factory defaults.
The following parameters are set to values other than factory defaults:
| Parameter | Value | Meaning |
|---|---|---|
| Pn000 | 0010 | Position control mode |
| Pn002 | 0100 | Use absolute encoder as incremental |
| Pn170 | 1400 | Disable tuning-less function |
| Pn200 | 0004 | Position control by A/B phases, 4x multiple |
| Pn20E | 1048576 | Electronic gear ratio numerator |
| Pn210 | 32768 | Electronic gear ratio denominator |
| Pn212 | 8192 | Encoder output cycles/revolution |
| Pn50A | 8101 | Disable P-OT input |
| Pn50B | 6548 | Disable N-OT input |
| Pn50E | 3200 | Remove /COIN and /V-CMP from output SO1 |
| Pn50F | 0100 | Put /BK (brake release) on output SO1 |
See the Yaskawa Sigma V series user manual for detailed
information on these and other servo drive parameters.
Yaskawa GA800 Spindle Drive Parameter Settings
Most spindle drive parameters are set to factory defaults.
The following parameters are set to values other than factory defaults:
| Parameter | Value | Meaning |
|---|---|---|
| A1-02 | 2 | Control Method (Open Loop Vector) |
| b1-01 | 1 | Frequency Reference Source (Analog Input) |
| b1-02 | 1 | Run Command Source (Digital Input) |
| b1-03 | 0 | Stopping Method (Ramp to Stop) |
| C1-01 | 5.0s | Acceleration Time |
| C1-02 | 5.0s | Deceleration Time |
| C6-01 | 0 | Operation Duty Selection (Heavy Duty) |
| E1-01 | 480VAC | Input AC Supply Voltage |
| E1-04 | 80.0Hz | Maximum Output Frequency |
| E1-05 | 480VAC | Maximum Output Voltage |
| E1-06 | 60.0Hz | Motor Base Frequency |
| E2-01 | 86.9A | Motor Rated Current |
| E2-04 | 6 | Motor Poles |
See the Yaskawa GA800 Drive User Manual for detailed
information on these and other spindle drive parameters.
Troubleshooting
Any time the control cannot complete its tasks normally, it will display a message in the scrolling message box, in the upper right corner of the screen, explaining what went wrong. You can use the touchscreen or a mouse to scroll up (back) in the message box to view the most recent 10 or so messages.
You can view older messages in the error message log, accessible from the F7/Utility menu:
Most common messages are described in Chapter 13 of the Centroid T-Series Operator's Manual.
The machine-specific PLC program can generate several of its own
fault, error and warning messages, in
addition to those listed in the Centroid operator's manual.
The machine-specific messages are listed later in this section.
PLC Diagnostic Display
You can use the PLC Diagnostic display on the console to view some of the Centroid PLC input, output and memory locations mentioned with these fault and error conditions. At the control's main screen, press Alt-I to activate the PLC Diagnostic display. Press Alt-I again to dismiss it.
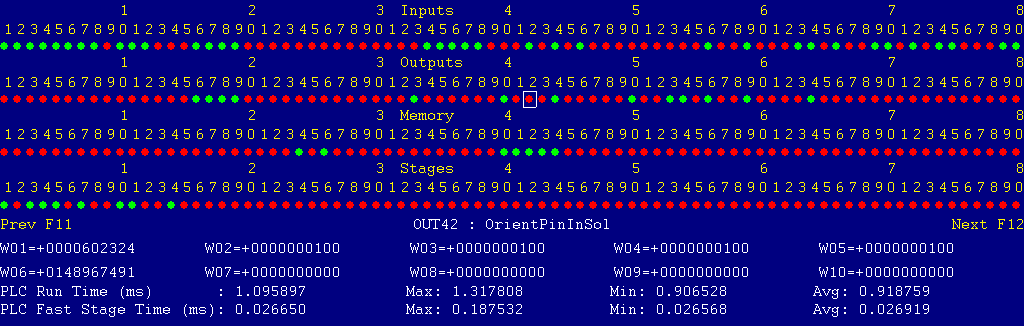
Each page of the Diagnostic display shows four rows of red and green dots: the first row shows PLC inputs 1 through 80; the second row PLC outputs 1 through 80; the third row PLC memory bits 1 through 80; and the fourth row PLC program stages 1 through 80.
You can use the arrow keys to move a highlight box over any of these locations. The name of the highlighted location will be displayed in the center of the screen below the red and green dots.
For example, in the illustration above the highlight box is on Output #42: The dot below the 2, to the right of the superscript 4, on the second line.
Below the four rows of bit status information are ten numeric ("word") variable values, labeled W1 through W10. Some of these variables also hold useful status information, described with the error and fault conditions to follow.
There are multiple pages of Diagnostic data. With the Alt-I diagnostic display showing, you can use the F12 and F11 keys to scroll right and left. For example, pressing F12 once will shift to the page showing inputs and outputs 81 through 160, and word variables W11 through W20.
Messages with 9000-series message numbers are Faults. After resolving the problem, you must press and release the Emergency Stop button to clear a Fault.
Messages with 8000-series message numbers are Errors. Errors will cancel the program cycle and stop the spindle and coolant, but they do not then need to be explicitly reset.
Messages with 5000-series and 2000-series message numbers are Warnings
and Informational Messages. They do not cancel the cycle or require
any action to reset.
Opening the Control Cabinet Doors
In some cases, it may be necessary to open the control cabinet doors while power is on. For example, servo drive and spindle drive fault conditions can be more readily identified using the codes displayed on, or stored in, the drive units themselves.
WARNING: Use appropriate caution when working in the control cabinets
while power is on. Lethal voltages, up to 480VAC and 700VDC, are
present on many components.
The control detected an internal error in processing the PLC logic program.
Report this error to your dealer, along with the values from W14 and W15. Also report what function the machine was performing when the fault occurred.
You must shut down and cycle the power to clear this fault.
References:
PLC W14: Copy of internal SV_PLC_FAULT_STATUS, indicating the type of problem
PLC W15: Copy of internal SV_PLC_FAULT_ADDRESS, indicating the location of the problem
The GA800 spindle drive (VFD) is reporting a fault condition.
This may occur if emergency stop is pressed, and then released within less than one second. In this case the safety relay (SR1) does not have time to reset, and so does not close again when emergency stop is released. Press emergency stop; wait at least two seconds; then release emergency stop.
Other spindle faults may result from over-voltage while decelerating, or from overload during spindle startup with a heavy load.
If the cause is not immediately evident, then check the LCD display on the spindle drive itself, in the right side of the cabinet.
You can review past drive fault conditions using the drive's parameters menu. The ten most recent fault codes are in parameters U3-01 through U3-10. See chapters 4 and 7 of the GA800 drive technical reference manual.
References:
PLC INP10: Spindle drive fault signal:  Green = 1 = Okay, Red = 0 = Fault
Schematic: Lines 8, 125
The control unit detected loss of communication from the operator panel in the console.
Check for damage or disturbance to the cables between the console and the Oak control unit in the control cabinet.
Press and release Emergency Stop to clear the fault.
References:
Schematic: Lines 88, 102
The operator panel reported back to the control unit a loss of communication from the control unit. This indicates the return signal from the operator panel is functioning normally, but the outgoing signal may have problems.
Check for damage or disturbance to the cables between the console and the Oak control unit in the control cabinet.
Press and release Emergency Stop to clear the fault.
References:
Schematic: Lines 88, 102
The way lube oil float switch tripped, indicating that the way lube unit is low on oil. The way lube unit is mounted on the outside of the right-hand column.
Check the way lube level. Refill as needed with Mobil Vactra #2 way lube, or equivalent.
Press and release Emergency Stop to clear the fault.
References:
PLC INP9: Lube float switch FS1 state.  Green = closed* = oil level low, Red = open* = oil level okay
Schematic: Line 125

* The CEN01 lube unit has a normally-open float switch which closes when the
  level is low.  This is inverted in the Centroid PLC logic, so that it appears
  as if it were a normally-closed float switch.
You exited the CNCT control software without first pressing Emergency Stop.
Always press Emergency Stop prior to exiting the control software.
Press and release Emergency Stop to clear the fault.
The lube pump has run for more than the number of seconds specified in Parameter 721, but has not yet pressurized the lube system. Check for open or broken lines.
Press and release Emergency Stop to clear the fault.
Once the fault is cleared, press the oil feed button on the lube unit and verify that you can hear the pump running.
References:
PLC OUT2: indicates lube pump power.  Green = On, Red = Off
PLC INP8: indicates lube pressure switch (PS1) state.  Green = closed = pressure down, Red = open = pressure up
Machine Parameter 721: Allowable time, in seconds, to build pressure
Schematic: Lines 124, 146
The lube pump pressurized the lines, but pressure did not then bleed back down in a reasonable length of time. This probably indicates clogged lines.
Press and release Emergency Stop to clear the fault.
References:
PLC INP8: indicates lube pressure switch (PS1) state.  Green = closed = pressure down, Red = open = pressure up
Machine Parameter 722: Allowable time, in seconds, to relieve pressure
Schematic: Lines 124, 146
The thermal switch in the regenerative braking resistor, on the right side of the control cabinet, opened to indicate that the resistor is overheating.
Allow time for the resistor unit to cool down, and the thermal switch to close again.
Press and release Emergency Stop to clear the fault.
References:
PLC INP14: Brake resistor thermal switch: Green = 1 = Okay,  Red = 0 = Overheat
Schematic: Lines 4, 127

The flood coolant pump motor tripped its overload protector (MMS4).
Check the MMS, on the right panel, for a trip indication (red lever in, black lever out). Check the flood coolant pump and reservoir for possible causes of overload.
Press the black lever on the MMS back in to reset it. You may have to wait several minutes for the MMS to cool before it can be reset.
Press and release emergency stop to clear the fault condition.
References:
PLC INP19: Trip indication from MMS4.  Green = 1 = On and Okay, Red = 0 = Tripped or Off
Schematic: Lines 29, 132
The rail clamp/unclamp motor tripped its overload protector (MMS5).
Check the MMS, on the right panel, for a trip indication (red lever in, black lever out). Check the crossrail clamp mechanism for possible causes of overload.
Press the black lever on the MMS back in to reset it. You may have to wait several minutes for the MMS to cool before it can be reset.
Press and release emergency stop to clear the fault condition.
References:
PLC INP20: Trip indication from MMS5.  Green = 1 = On and Okay, Red = 0 = Tripped or Off
Schematic: Lines 31, 132
The rail elevation motor tripped its overload protector (MMS6).
Check the MMS, on the right panel, for a trip indication (red lever in, black lever out). Check the crossrail clamps, gearheads and screws for possible causes of the overload.
Press the black lever on the MMS back in to reset it. You may have to wait several minutes for the MMS to cool before it can be reset.
Press and release emergency stop to clear the fault condition.
References:
PLC INP21: Trip indication from MMS6.  Green = 1 = On and Okay, Red = 0 = Tripped or Off
Schematic: Lines 33, 133
The right-hand hydraulic pump motor tripped its overload protector (MMS2).
Check the MMS, on the right panel, for a trip indication (red lever in, black lever out). Check the oil pump and reservoir for possible causes of overload.
Press the black lever on the MMS back in to reset it. You may have to wait several minutes for the MMS to cool before it can be reset.
Press and release emergency stop to clear the fault condition.
References:
PLC INP17: Trip indication from MMS2.  Green = 1 = On and Okay, Red = 0 = Tripped or Off
Schematic: Lines 25, 131
The left-hand hydraulic pump motor tripped its overload protector (MMS3).
Check the MMS, on the right panel, for a trip indication (red lever in, black lever out). Check the oil pump and reservoir for possible causes of overload.
Press the black lever on the MMS back in to reset it. You may have to wait several minutes for the MMS to cool before it can be reset.
Press and release emergency stop to clear the fault condition.
References:
PLC INP18: Trip indication from MMS3.  Green = 1 = On and Okay, Red = 0 = Tripped or Off
Schematic: Lines 27, 131
There was no "running" confirmation signal from the control cabinet air conditioner, located on the left side of the cabinet.
Check that the green power switch on the air conditioner is turned on. Check to see if circuit breakers CB6 or CB8 are tripped. These breakers protect transformer T1, which provides the 240VAC power for the air conditioner.
When air conditioner operation is restored, press and release emergency stop to clear the fault condition.
References:
PLC INP15: Air conditioner run status.  Green = 1 = Running, Red = 0 = Not running
Schematic: Lines 58, 128
You attempted to start a program cycle or run the table, but the crossrail is not fully clamped. Both the left and the right rail-clamped switches must close to confirm the rail is clamped.
Press the Rail Clamp key to clamp the crossrail. Verify that the red LED in the Rail Clamp key turns on steadily at the end of the clamping cycle.
References:
PLC INP22: Left-side rail-clamped switch LS5 status:  Green = 1 = Clamped, Red = 0 = Not clamped
PLC INP24: Right-side rail-clamped switch LS7 status  Green = 1 = Clamped, Red = 0 = Not clamped
Schematic: Lines 133, 134
A crossrail clamping cycle did not completely clamp the rail within the expected time. This may be due to interference with the clamp mechanism; a failure of one of the clamp-position switches on top of the crossrail; or failure of the clamp/unclamp motor to turn.
References:
PLC INP22: Left-side rail-clamped switch LS5 status:  Green = 1 = Clamped, Red = 0 = Not clamped
PLC INP24: Right-side rail-clamped switch LS7 status  Green = 1 = Clamped, Red = 0 = Not clamped
Schematic: Lines 31, 133, 134, 172
A crossrail unclamping cycle did not completely unclamp the rail within the expected time. This may be due to interference with the clamp mechanism; a failure of one of the clamp-position switches on top of the crossrail; or failure of the clamp/unclamp motor to turn.
References:
PLC INP23: Left-side rail-unclamped switch LS6 status:  Green = 1 = Clamped, Red = 0 = Not clamped
PLC INP25: Right-side rail-unclamped switch LS8 status  Green = 1 = Clamped, Red = 0 = Not clamped
Schematic: Lines 32, 134, 135, 173
The hydraulic pumps were running, but pressure from the #1 (right-hand) pump dropped out.

Check the oil level in the table transmission sight glass.
Press Emergency Stop to clear the fault. Release Emergency Stop and check the oil pressure gage.
References:
PLC INP6: Pressure switch PS2 status: Green = 1 = Pressure up,  Red = 0 = low or no pressure
Machine Parameter 720: Allowable pressure-drop time before error is reported (ms)
Schematic: Lines 25, 123, 169
The control lost communication with the PLC I/O expansion board.
Open the control cabinet and check for green "+5V" and "PLC OK" LED indications on the PLCADD1616 expansion board.
If either LED is not lit, check the connections at both ends of the gray cable which connects H8 on the Oak unit to H3 on the PLCADD1616 board.
References:
PLC W36: bitmap of detected PLC expansion boards.  1 = one board detected
Machine Parameter 900: bitmap of expected PLC expansion boards.  1 = one board expected
Schematic: Lines 107, 130
The PLC program requested display of a message on the screen, but the provided message code was not valid.
This indicates an error in the PLC program. Report the message to your dealer, along with the value in PLC variable W16.
References:
PLC W16: stores the invalid message code
The PLC hardware detected the presence of an I/O expansion board, but the setting of Machine Parameter 900 did not tell it to expect that board in the system.
On this machine, there should be one I/O expansion board installed, and Machine Parameter 900 should be set to 1.0.
References:
PLC W36: bitmap of detected PLC expansion boards.  1 = one board detected
Machine Parameter 900: bitmap of expected PLC expansion boards.  1 = one board expected
Schematic: Lines 107, 130
A previous servo drive fault condition has been resolved, and cleared with Emergency Stop.
A previous PLC fault condition has been resolved, and cleared with Emergency Stop.
You inadvertently pressed a keyboard combination that is used for keyboard jogging controls, but keyboard jogging features have been disabled on this machine.
A previous fault condition has been cleared with Emergency Stop.
The order of the axis drives; order of the axis definitions in the control configuration menus; and order of the axis jogging controls can vary. Definitions for this machine are as follows:
| Axis | Axis # | Drive # | Drive-Okay Bit | Jog Keys | MPG Position |
|---|---|---|---|---|---|
| Z | 1 | 1 | MEM16 | Z | 3 (Z) |
| X | 2 | 2 | MEM17 | X | 1 (X) |
20-May-2024 MBL
![]()